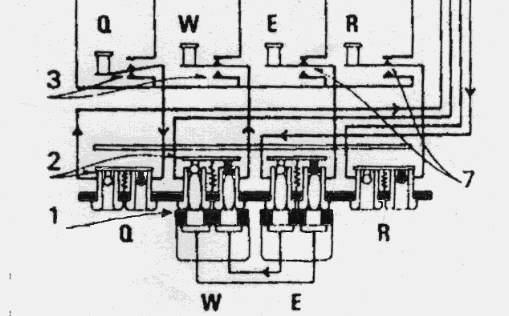
The components of the Enigma machine

Tony Sale's
Codes and Ciphers
The components of the Enigma machine |  Tony Sale's Codes and Ciphers |
you can return to the main text
The Plug Board (Stecker)
This is a detailed explanation of how the use of the plug board transposes a pair of letters.

This diagram (thanks to Garlinski), shows the complete wiring diagram
of the Enigma machine. At the top is the set of three wheels with their
scrambled internal wiring. To their left is the Reflector and to their right
the fixed entry disc.(6).
Below the wheels is the battery, (5), and below that the lamps (4). The
lamps for the letters Q W E R, are shown.
Next come the entry keys (3) and again Q W E R are shown. Finally comes the
plug board showing the sockets (2) for Q W E R and two plugs (1) inserted,
in W and E.
The first thing to note is that when an entry key is
pressed down, it breaks the connection to its corresponding lamp and
connects the battery to the right hand side (top in the real machine) of the
corresponding socket on the plug board. (the sockets, in pairs, are drawn
alongside one another for clarity in the diagram. In the real machine the
pair are arranged vertically).
When a plug is inserted, its pins
push onto the locators, lifting them from the sockets and because
of the insulating locator, breaking the connection between the two
sockets in a pair. The current now flows through the cable connected
to the other plug in the pair of two pin plugs. 
Here is a closeup view of the keys and plug board. The pairs of
sockets on the plug board have a shorting plate (2) on the inside
which is spring loaded to short together the two sockets in a pair
when no plug is inserted. However the shorting plate has one metal
locator on the left hand side in the diagram and one insulating
locator on the right hand side.
The plugs can only go into the pair of sockets one way because one
pin is larger than the other on each plug. The wiring in the cable
connecting two plugs is crossed over. It goes from the large pin on
one plug to the smaller pin on the other. this cross over is shown
in the diagram between W and E.
With the plugs inserted into W and E as shown, when the Q key is
pressed the current flows through the shorting link behind the sockets
on the Q pair to go to the Q entry point on the fixed entry disc.
It meanders through the wheels and reflector to finally emerge at the
E point on the entry disc. This is connected to the right hand side of
the E socket pair on the plug board but now since there is a plug in this
socket it cannot go through the shorting plate but instead goes through
the plugs cable to the W socket which again has its shorting plate lifted
and so the current goes to and lights the W lamp instead of the E lamp.
Furthermore it can be seen that if the W key had been presssed down,
then the connection to the entry disc would go through the plug cable to
the E socket and from there to the E entry point on the entry disc.
Thus the effect of plugging two sockets together is to completely transpose
both the lamps and keys.
This page was created by Tony Sale
the original curator of the Bletchley Park Museum,